Overview
Hi Everyone,
Yes, I am at it again. Been a very busy month with astronomy projects since we are all at ‘Stay at Home’ orders due to the Coronavirus! So I decided to build a new Pier Mount for my observatory so I can have two telescopes imaging at the same time. Below you can find the pieces parts that were needed to complete this project. Since the observatory was already completed 3 years ago it was a little challenging.
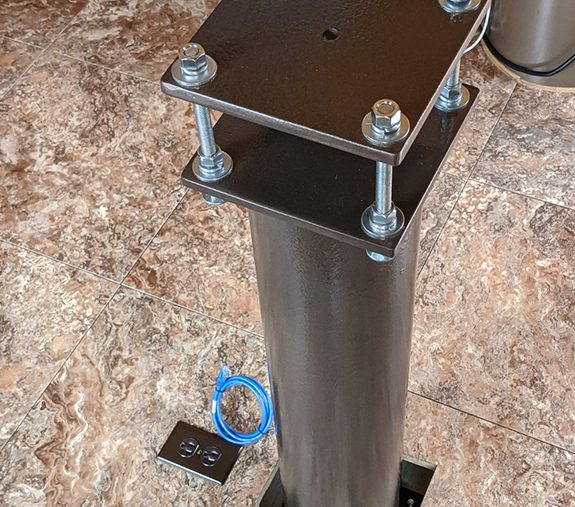
I would not have been able to finish the design without Mike Neal’s help (Current ERAS V.P.). Mike was able to obtain a 6 5/8″ round heavy wall pipe and I purchased the 3 (8″ X 8″ square) 1/2″ steel plates. Mike used his MiG welder and attached the bottom and top plates squaring them up. After getting home I then drilled (13) 1/2″ holes in this 1/2 thick steel. Yes, no fun and took a long time, but 3 drill bits later I got it done. You can see in the photos how nice it turned out after it was painted and the hardware installed to support the ‘Rat Cage’ for leveling the telescope. See all the photos below for the final product installed into the concrete and telescope system too.
Dave Collings – ERAS Web Master/Secretary/ALCOR
Project Details
(1) 33″ tall 6 5/8″ steel heavy wall pipe ($0.00)
(3) 8″ X 8″ 1/2″ thick squares cut by a local exhaust welding company ($30.00)
(4) 7″ bolts
(16) 1/2″ washers
(8) 1/2 lock washers
(4) 1/2″ lock nuts
(4) 5/8″ concrete anchors with studs and nuts
Masonry Hammer Drill with 5/8″ masonry bit
Took 2 cans of Hammered brown paint to get it painted and looking nice. I had to cut an 10″ square hole through the observatory floor so I could drill the holes into the concrete below to install the new Pier Mount. Actually drilling the holes and installing the mount was no big deal. Only took about an hour to get that part done. Of course then I need to come up with a decorative idea to make the top of the floor look nice as seen in the picture. That was just a piece of 1/4′ plywood and some decorative stick squares from Lowes. About $8 for it all.
Dave


